Operations - Tutorial
ActiveQL does provide per convention standard queries and mutations based on your entities. We think that this is often the easiest way to interact with your domain graph. Some might consider generic CRUD queries and mutations an anti-pattern though; see e.g.: https://xuorig.medium.com/graphql-mutation-design-anemic-mutations-dd107ba70496 (opens in a new tab)
We find both approaches in nearly every application useful. You often have a number of quite simple entities with relations to each other (often so called basic data) and it should be a simple as possible to offer CRUD operations to these entities. On the other hand you have non-trivial business requirements. So, when it comes to complex business logic we strongly recommend to implement custom queries and mutations - or even better to use operations.
An operation will be compiled into a mutation with
- input in which you express
- multiple types and attributes that may or may not be referencing existing entities
- dedicated dynamic validation logic specific for the input of this operation
- return that includes
- attribute dispositions - this is the current state of input requirements - see below
- validation violations
- the actual result - that can be an Entity item or custom type
- default or custom logic for
- evaluating the attribute dispositions
- validating the operation input (per default against the dispositions)
- making 3rd party API calls
- executing any custom code
- saving any data from the input (via entities) to the data store in a single transaction
- determine the result value
Example
Let's start with a simple Example [1] (opens in a new tab). See the following enum, entity and operation:
enum:
  Brand:
    - Mercedes
    - BMW
    - Opel

entity:
  Car:
    attributes:
      brand: Brand!
      color: String
      power: Int

operation:
  NewCar:
    input: Car
    result: Car
Enum and entity should look familiar and you might have an intuition what the operation NewCar does. It takes a Car input, creates a Car item and returns it. This is how it looks in the GraphQL schema:
type Mutation {
  ...
  NewCar(Car: NewCar_Car): NewCarReturn
  ...
}
Let's just call this as we would with any other mutation in our domain graph.
mutation NewCar($car: NewCarInput_Car) {
  NewCar(car: $car) {
    result {
      car {
        id
        brand
        color
        power
        createdAt
      }
    }
    validationViolations {
      path
      message
    }
  }
}
{
"car": {
"brand": "BMW",
"color": "white",
"power": 190
}
}{
"data": {
"NewCar": {
"result": {
"Car": {
"id": "ttqV4p4LqjkX2kBG",
"brand": "BMW",
"color": "white",
"power": 190,
"createdAt": "2022-11-17T13:16:02.574Z"
}
},
"validationViolations": []
}
}
}It works! But where is the difference to the standard createMutation? It will become clearer when we write the same operation a bit more expressive (using less syntactic sugary shortcuts) and look at the generated schema excerpt. Example [2] (opens in a new tab)
operation:
  NewCar:
    input:
      Car:
        entity: Car
        attributes: true
    result:
      fields:
        car: Car
type Mutation {
NewCar(Car: NewCarInput_Car): NewCarReturn
}
type NewCarReturn {
validationViolations: [ValidationViolation]
result: NewCarResult
inputDispositions: JSON
}
type NewCarResult {
car: Car
}
input NewCarInput_Car {
id: ID
brand: Brand
color: String
power: Int
}It may become clear that some new types where generated from this operation. The names are determined by convention, we could have (as alway) changed that, but there is no need to
NewCarInput_Car- input type (which in this case is based on the entityCar)NewCarReturn- the return type of the operation's mutationNewCarResult- which has one field that references aCartype
But why not using the existing types? As you might see we still used the shortcut attributes: true which means to take all attributes from the Car entity as they are defined there. We can now - however - change this, according to our business requirements. Let's say that power is not a required attribute in the Car entity but for some reason it should be required in this operation. Also we do not want to include the color attribute defined in Car here. Let's see the configuration and resulting GraphQL schema. Example [3] (opens in a new tab)
operation:
  NewCar:
    input:
      Car:
        attributes:
          brand: true
          power:
            required: true
    result: Car
input NewCar_Car {
brand: Brand!
power: Int!
}Now only the given attributes are included in the type. You might have seen that attributes: true did also include the id attribute. This means we could have also updated a Car item when providing an id. So with explicitly stating the attributes for this entity in this operation we can define whether an update is allowed or not.
Since every call to this operation is now a create the brand and power attributes are now mandatory fields in the schema type and we can rely on GraphQL to ensure values are provided. Required is of course just one example of many aspects or properties of an attribute that can be configured. We will come to other aspects in a moment.
Implementing your Business Logic
So far our business logic was as simple as can be. An attribute of the operation input is required. Lets now assume the following business requirement for this operation:
- a value for the
powermust exists if thebrandof the new car isBMW,- otherwise it's optional.
Let's see some ways to fulfill this requirement.
Decision Table
Decision tables are a great standardized way to express semi-complex business logic via configuration. For a thorough description see Decision Tables.
For this example we need a very simple decision table. The visual representation of such a decision table regarding to the DMN standard (opens in a new tab) would look something like this:
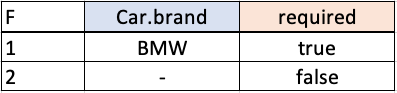
Without going in too much detail, this decision table consists of one input expression (Car.brand) and one output expression (required). There are two rules that are evaluated in this order and the first (specified by the F hit indicator in the upper left corner) rule with all matching input expressions determines the output result. So if there is the value BMW for the path Car.brand in the input of this operation, the first rule would apply and evaluate required to true. In any other case (the term '-' meaning any value would match the expression) required would evaluate to false.
Let's use this decision table in our operation configuration. Example [4] (opens in a new tab)
operation:
  NewCar:
    input:
      Car:
        attributes:
          brand: true
          power:
            required:
              input:    Car.brand
              output:                required
              rules:
                - [     '"BMW"' ,   'true'    ]
                - [     '-' ,       'false'   ]
    result: Car
As you might have noticed, we use the possibility to use JSON inside YAML to use the JSON array format in order to achieve a bit more "visual / table-like" look of the decision table configuration. This way it's easier for a human reader to understand the underlying business logic. But that's of course optional.
Let's test the validation behavior now. We should see the difference of the required property of power in the attribute dispositions and get a validation violation if we omit the power value if brand is BMW and a result for any other brand value.
mutation NewCar($car: NewCarInput_Car) {
  NewCar(car: $car) {
    result {
      car {
        id
        power
        brand
      }
    }
    validationViolations {
      path
      message
    }
  }
}
{
"car": {
"brand": "BMW"
}
}{
"data": {
"NewCar": {
"result": null,
"validationViolations": [
{
"path": "car.power",
"message": "is required"
}
]
}
}
}{
"car": {
"brand": "OPEL"
}
}{
"data": {
"NewCar": {
"result": {
"car": {
"id": "CkKbz7hzb6ahIeSl",
"power": null,
"brand": "OPEL"
}
},
"validationViolations": []
}
}
}(FEEL) Expression
The input conditions and output expressions of a decision table are in fact FEEL expressions. FEEL stands for Friendly Enough Expression Language and is a simple language defined as part of the Decision Model And Notation (DMN) of the Object Management Group (OMG). We can use FEEL as part of decision table inputs and outputs as well as standalone expression.
The FEEL implementation of ActiveQL is based on js-feel (opens in a new tab). You should check the documentation for further information. Basic use cases should be intuitiv though. The advantage over callbacks is that if you use a static expression it becomes available to the API's user and could even be used outside of your API even in other programing languages and environments. It's also less intrusive and gives less room for developer to write code dependent to internal API, thus making it probably harder to upgrade.
Let's see how to implement our requirement using a FEEL expression. Example [5] (opens in a new tab)
operation:
  NewCar:
    input:
      Car:
        attributes:
          brand: true
          power:
            required:
              expression: car.brand = "BMW"
    result: Car
Notice how we can access the the operation's input here by simply using the path. This even works with nested and array input types which we will cover later. FEEL expressions can evaluate to boolean (as in this example) or any other type. You must make sure the return type of an expression matches the property type. Some default casting (as 0 to false and !=0 to true) take place but you should not rely on it. You can also use if-then-else in you expression. So this example could have written a bit more expressively as
power:
  required:
    expression: >
      if car.brand = "BMW" then true else false
For more check the documentation at js-feel (opens in a new tab).
Callback Code
Let's now assume your business logic turns out to be too complex to be expressed via expression or decision table. In this case we can implement the logic in a callback. For now we stick with our simple example just do show how this can be achieved.
Since we cannot write the callback code in YAML/JSON we implement this in a typescript DomainConfiguration object. You can either configure the whole operation in object notation or just the callback part - it will merged together for runtime. Example [6] (opens in a new tab)
export const domainConfiguration:DomainConfiguration = {
  operation: {
    NewCar: {
      input: {
        Car: {
          attributes: {
            brand: true,
            power: {
              required: (ctx:OperationContext) => {
                const brand = ctx.input.car.brand;
                return brand === 'BMW';
              }
            }
          }
        }
      },
      result: 'Car'
    }
  }
}
Attribute Dispositions
So far we have seen how to define one aspect of an operation input's attribute (required). An ActiveQL operation allows you to configure the following properties of an attribute using either static values or dynamically, meaning they are determined at runtime (e.g. based on attribute's values in the input, the rights of the caller or anything else regarding your business requirements).
The following table should give a quick overview. For a detailed discussion, check the operation configuration documentation.
| property | type | default | description |
|---|---|---|---|
| required | boolean | false | if true; validation violation if attribute value is null or undefined in input |
| omit | boolean | true | if true; validation violation if any attribute value (other than undefined) in input |
| unique | boolean | false | if true; validation violation if any other entity item with the same attribute value exists |
| pattern | string | if given; validation violation if attribute value does not match pattern | |
| range | [number, number] | if given; validation violation if attribute value is not within range (semi open) | |
| allowed | any[] | if given; validation violation if attribute value is not included in array values | |
| validation | ValidateJS config | if given; validation of attribute value using ValidateJS (opens in a new tab) | |
| resources | object | arbitrary resources for an API client, e.g. a form UI for this attribute | |
| value | any | if this property is configured, the attribute will not be included in the operation's input type. When an entity item is saved, the value of the attribute will be determined hereby instead |
Let's think a moment at the consumer of your API. When the properties of the input are dynamic, it would not be sufficient to consult the documentation of your API to make sure to create a valid input for an operation call. You cannot know, whether an attribute is e.g. required or not. If the input comes from a UI you could not give a user some hints about valid input. The developer of an UI could either re-implement the underlying business logic, or send an input and present the user with the validation violations so she could correct their input. Obviously it would be much better to indicate a field in the UI as required or limit the entry to the actual allowed values of an attribute than to show a validation error for a null or unallowed value to the user after sending the data. There should be a way for the API's client to get the validation requirements before even validating any user's input. This is what attribute dispositions are for. A client can call an operation's mutation and request it's dispositions.
Let's take a look with our previous example, but instead of requesting the actual result or validation violations we ask for the attributeDispositions
mutation {
  NewCar {
    inputDispositions
  }
}
{
"data": {
"NewCar": {
"inputDispositions": {
"Car": {
"type": "NewCarInput_Car",
"list": false,
"required": false
},
"Car.brand": {
"type": "Brand",
"list": false,
"required": true,
"unique": false,
"allowed": [
"MERCEDES",
"BMW",
"OPEL",
"PORSCHE"
]
},
"Car.power": {
"type": "Int",
"list": false,
"required": true
}
}
}
}
}mutation NewCar($car: NewCarInput_Car) {
NewCar(Car: $car) {
inputDispositions
}
}{
"car": {
"brand": "BMW"
}
}{
"data": {
"NewCar": {
"inputDispositions": {
...
"Car.power": {
"type": "Int",
"list": false,
"required": true
}
}
}
}
}{
"car": {
"brand": "OPEL"
}
}{
"data": {
"NewCar": {
"inputDispositions": {
...
"Car.power": {
"type": "Int",
"list": false,
"required": false
}
}
}
}
}Notice how the requirement property of the power attribute changes, depending on the operation's input.
With this the client would have (nearly) all necessary information to build a UI - even dynamically based on the previous input by a user. For a full discussion of the attribute dispositions and the relation to the domain definition check the documentation.
Input Definitions
So far we've defined one input type Car with a dependency to an existing entity. We referred to individual attributes of this entity. We can however also add new attributes to this type. Obviously any value of such an attribute would not be saved by the entity, since it doesn't know about it. But we can use it as part of our operation.
Let's implement a bit more complex logic in our operation. Consider the following business requirement:
The
powerin theCarentity is in the unit horsepower (hp). TheNewCaroperation however should accept thepowerof the car in horsepower (hp) or kilowatt (kw).
Since the value should is stored in the Car entity in horsepower (hp) we need an additional attribute for the unit to state which unit should be used. We can then use a decision table for the conditional conversion. Example [7] (opens in a new tab)
operation:
  NewCar:
    input:
      Car:
        attributes:
          brand: true
          powerUnit:
            type:
              - hp
              - kw
            required: true
          power:
            required: true
            value:
              input:  car.powerUnit
              output:                 value
              rules:
                - [   '"hp"',         'car.power'        ]
                - [   '"kw"',         'car.power*1.341'  ]
    result: Car
Notice the additional attribute powerUnit. It behaves the same as any other attribute (e.g. validates to required) except it isn't saved automagically. But we don't want that anyhow.
On the other hand the attribute power has now a value decision table determing the actual value.
mutation NewCar($car: NewCarInput_Car) {
  NewCar(car: $car) {
    result {
      car {
        id
        power
        brand
      }
    }
  }
}
{
"car": {
"brand": "BMW",
"powerUnit": "hp",
"power": 200
}
}{
"data": {
"NewCar": {
"result": {
"car": {
"id": "ZjlkrWbkSr9rN2s1",
"brand": "BMW",
"power": 200
}
}
}
}
}{
"car": {
"brand": "BMW",
"powerUnit": "kw",
"power": 200
}
}{
"data": {
"NewCar": {
"result": {
"car": {
"id": "pJj3SCLK5k2naZyR",
"brand": "BMW",
"power": 268
}
}
}
}
}We are not limited to add attributes to types, we can add types that do not refer to any entity as well. So we could have written the previous example as follows (Example [8] (opens in a new tab))
operation:
  NewCar:
    input:
      PowerData:
        attributes:
          unit:
            type:
              - hp
              - kw
            required: true
      Car:
        attributes:
          brand: true
          power:
            required: true
            value:
              input:  PowerData.unit
              output:                 value
              rules:
                - [   '"hp"',         'car.power'          ]
                - [   '"kw"',         'car.power * 1.341'  ]
    result: Car
Notice the second input PowerData in this operation and how we use the path PowerData.unit in the decision table. Since we did not reference any entity in its definition (and there is no entity with this name defined), there is no connection to any existing entity. The attributes are nonetheless part of the input type, the dispositions will be resolved and their input values validated. The auto-magic saving of entity items of course cannot happen with this input, since ActiveQL would not know, how to store or retrieve these. For these kind of scenarios (which will be the usual) you would add custom callbacks to your operation which we will cover later.
Nested Inputs
So far we have defined simple operation inputs that did not have any relations witch each other. Let's have a look at a bit more complex example. With two entities in our operation's input. Example [9] (opens in a new tab)
entity:
  Car:
    assocFrom: Equipment
    attributes:
      brand: Brand!
      color: String
      power: Int

  Equipment:
    assocTo: Car
    attributes:
      category:
        type:
          - engine
          - transmission
          - control
          - auxiliaries
      name: String!
      price: Int

operation:
  NewCar:
    input:
      Car:
        attributes: true
        assoc:
          Equipment: true
    result: Car
input NewCarInput_Car {
ID: ID
brand: Brand
color: String
power: Int
equipments: [NewCarInput_Car_Equipment]
}
input NewCarInput_Car_Equipment {
ID: ID
name: String
price: Int
carId: ID
}We see two entities with 1-n relationship. Notice how we embedded the Equipment input (referring to the Equipment entity) in the input type of Car. You might see this is configured via assoc, besides attributes. assoc does not state the nature of the association, this is determined from the entities associations. Since in our entities Car has many Equipments you see in the input type NewCarInput_Car a field equipments (which is the typesQueryName of its entity). If we would change for a moment the entity association from a has many to has one (assocBy), notice how the same assoc now results in a single Equipment as part of the Car input type. Example [10] (opens in a new tab)
entity:
  Car:
    assocBy: Equipment # <-- to 1
    attributes:
      brand: Brand!
      color: String
      power: Int

  Equipment:
    assocTo: Car
    attributes:
      category:
        type:
          - engine
          - transmission
          - control
          - auxiliaries
      name: String!
      price: Int

operation:
  NewCar:
    input:
      Car:
        attributes: true
        assoc:
          Equipment: true
    result: Car
input NewCarInput_Car {
ID: ID
brand: Brand
color: String
power: Int
"""no longer a list""""
equipment: NewCarInput_Car_Equipment
}
input NewCarInput_Car_Equipment {
ID: ID
name: String
price: Int
carId: ID
}But let's switch back to a Car -(1)-----(*)- Equipment relationship and let's add a car with some equipment Example [9] (opens in a new tab).
mutation NewCar($car: NewCarInput_Car) {
  NewCar(car: $car) {
    result {
      car {
        id
        brand
        equipments {
          id
          name
          price
        }
      }
    }
  }
}
{
"car": {
"brand": "BMW",
"equipments": [
{
"name": "trailer hitch",
"price": 349
},
{
"name": "sound system"
}
]
}
}{
"data": {
"NewCar": {
"result": {
"car": {
"id": "fDvnsRHO5fAhK8DP",
"brand": "BMW",
"equipments": [
{
"id": "QMtwjTlC83uUOb6N",
"name": "sound system",
"price": null
},
{
"id": "GXQyXREf7la5HI4u",
"name": "trailer hitch",
"price": 349
}
]
}
}
}
}
}As you see we are able to create three entity items with one call and within one transaction. We could have achieved this by using the default mutation of the entities Car and Equipment (in separate transactions though). Whether you want to offer the one and/or the other depends on your business requirements.
Maybe you've seen that price is not a mandatory attribute in the Equipment entity, therefore we could create an Equipment item in our operation without a price. Let's assume in this operation price should be mandatory. We already have seen, how to achieve this - let's apply this to the nested input type - Example [11] (opens in a new tab).
operation:
  NewCar:
    input:
      Car:
        attributes: true
        assoc:
          Equipment:
            attributes:
              name: true
              price:
                required:
                  expression: 'true'

    result: Car
Please notice how we used required: { expression: 'true' } for the the price attribute. Since it is now not a static value (which would be required: true) the corresponding field in the input type would not be mandatory and would allow us to call the operation without a price but give a validation violation instead.
mutation NewCar($car: NewCarInput_Car) {
  NewCar(car: $car) {
    result {
      car {
        id
        brand
        equipments {
          id
          name
          price
        }
      }
    }
    validationViolations {
      path
      message
    }
  }
}
{
"car": {
"brand": "BMW",
"equipments": [
{
"name": "trailer hitch",
"price": 349
},
{
"name": "sound system"
}
]
}
}{
"data": {
"NewCar": {
"result": null,
"validationViolations": [
{
"path": "car.equipments.1.price",
"message": "is required"
}
]
}
}
}You see how the validation violation uses the index of our equipments in the attribute path.
Let's consider the following business requirement:
The
priceof anEquipmentitem should be mandatory if thecategoryof this item isengine.
Let's have a look at the following Example [12] (opens in a new tab).
operation:
  NewCar:
    input:
      Car:
        attributes: true
        assoc:
          Equipment:
            attributes:
              name: true
              category:
                required: 'true'
              price:
                required:
                  input:  car.equipments.*.category
                  output:                             required
                  rules:
                    - [   '"engine"',                 true      ]
                    - [   '-',                        false     ]
    result: Car
Notice the car.equipments.*.category in the input of the decision table we're using to determine the required property of the price attribute. Of course there is no value under this path in the input. It is simply a way to say, take the category value in the same equipment item you're trying to determine the required property value. Let's say we evaluate the 1st Equipment item, this term will be translated to car.equipments[0].category, in the 2nd item it would be car.equipments[1].category etc. You can of course use the full path in you expression if you want to reference a specific item.
Please keep in mind, if you have a complex validation logic you can always implement a callback function to express your business requirement. Let's say we have a business requirement as follows:
Make sure at least one of the
Equipmentitems should have acategorywith the valueengine.
We could write this as in Example [13] (opens in a new tab)
export const domainConfiguration:DomainConfiguration = {
  operation: {
    NewCar: {
      input: {
        Car: {
          assoc: {
            Equipment: {
              validation: (ctx:OperationContext) => {
                const atLeastOneEngine =
                  _.find( ctx.input.car?.equipments, equipment => equipment.category === 'engine' );
                if( ! atLeastOneEngine ) ctx.validationViolations.push({
                  path: `car.equipments`,
                  message: `should have at least one item with category 'engine'` });
              }
            }
          }
        }
      }
    }
  }
}
Again, the use of lodash (opens in a new tab) is of course optional. Also we only implemented the validation callback in the DomainConfiguration object, the rest is still in yaml configuration (not listed here). When we call the operation now, we see the results of the validation callback alongside any other validation.
mutation NewCar($car: NewCarInput_Car) {
  NewCar(car: $car) {
    validationViolations {
      path
      message
    }
  }
}
{
"car": {
"brand": "BMW",
"equipments": [
{
"name": "heads display",
"category": "auxiliaries"
},
{
"name": "sport steering wheeel",
"category": "control"
}
]
}
}{
"data": {
"NewCar": {
"validationViolations": [
{
"path": "car.equipments",
"message": "should have at least one item with category 'engine'"
}
]
}
}
}{
"car": {
"brand": "BMW",
"equipments": [
{
"name": "heads display",
"category": "auxiliaries"
},
{
"name": "sport steering wheeel",
"category": "engine"
}
]
}
}{
"data": {
"NewCar": {
"validationViolations": [
{
"path": "car.equipments.1.price",
"message": "is required"
}
]
}
}
}Implementing Business Logic
So far our business requirements were validation requirements. Once the validation of an operation's input passes, all we do is to save the input (as long as the input type refers to an entity).
This is often sufficient but of course, sometimes you want to implement your own strategy how to store data, probably call another API yourself etc. Please check Operation Lifecycle to see how this can be done.
Loading entities and calling REST API's
While you could implement any of the operations lifecycle methods in Javascript or Typescript, there are some simple ways to express business logic by configuration.
A common use case for the business logic of an operation is calling another API. Let's first see the following Example [14] (opens in a new tab)
enum:
  Brand:
    - Mercedes
    - BMW
    - Opel

  Fuel:
    - diesel
    - super

entity:
  Car:
    attributes:
      brand: Brand!
      fuel: Fuel!
      power: Int
    seeds:
      - brand: Mercedes
        fuel: diesel
        power: 190
      - brand: Opel
        fuel: super
        power: 110

  Driver:
    attributes:
      firstname: String!
      lastname: String!
    seeds:
     3:
      firstname:
        faker: person.firstName
      lastname:
        faker: person.lastName

  Rental:
    assocTo:
      - Car!
      - Driver!
    attributes:
      start: Date!
      end: Date

operation:
  RentCar:
    input:
      Rental:
        attributes:
          carId: true
          driverId: true
          start: true
    result: Rental
The enum and entity configurations should be familiar. Notice the seeds configuration. So after calling the seed mutation we can rely on having 2 car items and 3 driver items. The Rental entity basically takes a Car and Driver id and start and end Date and stores it. A very simple implementation, but sufficient for our use case.
You should also unterstand the RentCar operation by now. It takes some of the Rental attributes (those needed to start to rent a car), creates the Rental entity item and returns it.
Lets call some of it and see the default behavior:
mutation{
  seed( truncate: true )
}
Seed some test data
{
  "data": {
    "seed": [
      "Truncated Car",
      "Truncated Driver",
      "Truncated Rental",
      "Seeded 2 Car items",
      "Seeded 3 Driver items"
    ]
  }
}
query {
cars {
id
indication
fuel
}
drivers {
id
indication
}
}Query cars and drivers to get some ids to use in the CarRent operation
{
  "data": {
    "cars": [
      {
        "id": "en5opMGNAase1WVv",
        "indication": "Opel",
        "fuel": "super"
      },
      {
        "id": "YvdK0lSZ86XRfZV6",
        "indication": "Mercedes",
        "fuel": "diesel"
      }
    ],
    "drivers": [
      {
        "id": "xjA77qbDNss01MfG",
        "indication": "Torp, Niko"
      },
      {
        "id": "6XNAP9J0qufuXemJ",
        "indication": "Cronin, Kyle"
      },
      {
        "id": "1RufK4yWqrCO2vep",
        "indication": "Prosacco, Noble"
      }
    ]
  }
}
mutation RentCar($rental: RentCarInput_Rental) {
RentCar(rental: $rental) {
result {
rental {
id
start
car {
indication
fuel
}
driver {
indication
}
}
}
validationViolations {
path
message
}
}
}{
"rental": {
"carId": "FuZMi0yL4MuwzhDP",
"driverId": "zZwknejDr5QoW5CV",
"start": "2022-12-02",
}
}Call CarRent operation
{
  "data": {
    "RentCar": {
      "result": {
        "rental": {
          "id": "PM3EXcUzXiRvLyDk",
          "start": "2022-12-02",
          "car": {
            "indication": "Opel"
          },
          "driver": {
            "indication": "McLaughlin, Emma"
          }
        }
      },
      "validationViolations": []
    }
  }
}
We successfully created a Rental item.
So far the operation works. Let's now consider the following (admittedly artificial) business requirement:
When renting a car, the location of the car should be provided (in latitude and longitude). Before actually creating the
Rentalthe current gas prices at the nearest gas station of the given location should be determined. Only when the price for the fuel type of the car is below a given threshold, the rental should actually be created - otherwise a validation error should be given.
Let's examine this requirement and start with what we already have and what we would need.
We have:
- the
idof aCarand validation this car exists - the
idof aDriverand validation this driver exists
We would need:
- extending the input with fields for the
latitudeandlongitudeof a location - loading the
Caritem to get thefueltype - calling an API that gives us the gas prices for a given location
- validating the input of the operation regarding the
fueltype and gas prices from the API call
We know already how to add fields to the operation's input. We could - as always - implement the remaining business logic in code, but luckily ActiveQL allows to express everything configuratively.
Since we want to use loaded car item and the result from the RestCall use in the validation we need to do this in the beforValidation callback. Instead of actually coding the callback we can give one or many of the following configurations.
entity | sets one or many entity item(s) into the data of the operation |
restCall | executes a RestCall |
Look at the Example [15] (opens in a new tab)
operation:
  RentCar:
    input:
      Location:
        attributes:
          lat: Float!
          lon: Float!
      Rental:
        attributes:
          carId: true
          driverId: true
          start: true
    result:
      fields:
        rental: Rental
    beforeValidation:
      - entity: Car
        id: rental.carId
As you see in the beforeValidation callback we execute the typeQuery of the Car entity. Since we did not state any specific path in the callback configuration, the item is stored with the _entity's typeQueryName (car per default) in the operation's data. So any subsequent callback or implementation can access the items there, e.g. in an expression or decision table.
Now we need to call an external Rest API with the location values from the operation's input.
We are using a free API to get gas prices in Germany - https://creativecommons.tankerkoenig.de (opens in a new tab)
From the API documentation we learn that the url for getting the gas prices is as follows:
https://creativecommons.tankerkoenig.de/json/list.php?lat=52.521&lng=13.438&rad=1.5&sort=dist&type=all&apikey=00000000-0000-0000-0000-000000000002
We would need 3 dynamic values for this call, the lat, lon and apikey. We could have let the API key in the url but is is best practice to have it separately.
The result would be something like this:
{
  "ok": true,
  "license": "CC BY 4.0 -  https://creativecommons.tankerkoenig.de",
  "data": "MTS-K",
  "status": "ok",
  "stations": [
    {
      "id": "474e5046-deaf-4f9b-9a32-9797b778f047",
      "name": "TOTAL BERLIN",
      "brand": "TOTAL",
      "street": "MARGARETE-SOMMER-STR.",
      "place": "BERLIN",
      "lat": 52.53083,
      "lng": 13.440946,
      "dist": 1.1,
      "diesel": 1.109,
      "e5": 1.339,
      "e10": 1.319,
      "super": 1.319,
      "isOpen": true,
      "houseNumber": "2",
      "postCode": 10407
    },
    ... more gas stations
  ]
}
From the result we are interested in the super and diesel prices of the nearest station; and the path to this are clear now. From all this the configuration is quite straightforward. Example [16] (opens in a new tab)
restCall:
  GetGasPrices:
    endpoint: 'https://creativecommons.tankerkoenig.de/json/list.php?lat=${latitude}&lng=${longitude}&rad=1.5&sort=dist&type=all&apikey=${apiKey}'
    attributes:
      latitude: 'Location.lat'
      longitude: 'Location.lon'
      apiKey:
        value: "59c56d4d-e88f-67ab-92e3-214cdfc1815f"
    result:
      - from: 'stations.0.diesel'
        to: 'gas.diesel'
      - from: 'stations.0.e10'
        to: 'gas.super'
      - from: 'stations.0.brand'
        to: 'gas.brand'
This is GET RestCall (for more check the documentation) therefore we mainly state the URL as the endpoint with the dynamic values that are determined by attributes. Per default the value of an attribute is gathered from the context (which in case a RestCall is called within an operation is the operation's data) or as static value or the result of an expression.
We can now add the RestCall to the beforeValidation of the operation. And as you might have seen we set the result values of the rest call under the path gas.*. So we can include this in our operation's result and allow to request the values. We could either create a type for it, or (to make things easy) use the generic datatype JSON. The default buildResult function tries to find any result type field in the operation's data and sets it in the result.
operation:
  RentCar:
    input:
      Location:
        attributes:
          lat: Float!
          lon: Float!
      Rental:
        attributes:
          carId: true
          driverId: true
          start: true
    result:
      fields:
        rental: Rental
        gas: JSON
    beforeValidation:
      - entity: Car
        id: rental.carId
      - restCall: GetGasPrices
Let's call the operation now and we should see the created Rental entity item and the rest call results.
mutation RentCar(
    $rental: RentCarInput_Rental,
    $location: RentCarInput_Location) {
  RentCar(
      rental: $rental,
      Location: $location) {
    result {
      gas
      rental {
        car {
          brand
          indication
        }
        driver {
          indication
        }
      }
    }
    validationViolations {
      path
      message
    }
  }
}
{
"rental": {
"carId": "en5opMGNAase1WVv",
"driverId": "xjA77qbDNss01MfG",
"start": "2022-12-02",
},
"location": {
"lat": 53.551086,
"lon": 9.993682
}
}We took carId and driverId from the query earlier. The lat and lon are the latitude and longitude coordinates for Hamburg. You can obtain these values at sites like https://www.latlong.net/convert-address-to-lat-long.html (opens in a new tab)
{
  "data": {
    "RentCar": {
      "result": {
        "gas": {
          "diesel": 1.779,
          "super": 1.699,
          "brand": "OIL!"
        },
        "car": {
          "brand": "Opel",
          "indication": "Opel"
        },
        "driver": {
          "indication": "Torp, Niko"
        },
        "rental": {
          "car": {
            "brand": "Opel"
          }
        }
      },
      "validationViolations": []
    }
  }
}
The Rental item was created and we see the results of the RestCall.
The remaining part is to combine what we have in a validation. Since we do not validate a certain attribute or input we put our validation at the level of the operation itself. [17] (opens in a new tab)
operation:
  RentCar:
    validation:
      input:  ['gas.diesel', 'gas.super',  'car.fuel']
      output: [                                        'valid', 'message']
      rules:
        - [    '> 1.7',      '-',          '"diesel"', 'false', '"Diesel price too high"']
        - [      '-',         '> 1.9',      '"super"',  'false', '"Super price too high"']
        - [      '-',         '-',          '-',        'true',  ''                      ]
    input:
      Location:
        attributes:
          lat: Float!
          lon: Float!
      Rental:
        attributes:
          carId: true
          driverId: true
          start: true
    result:
      fields:
        rental: Rental
        car: Car
        driver: Driver
        gas: JSON
    beforeValidation:
      - entity: Car
        id: rental.carId
      - restCall: GetGasPrices
As you noticed, we put a quite low threshold (at least for the time this document was written) for the gas prices, so for a car with fuelType 'diesel' a Rental should not be valid.
mutation RentCar(
    $rental: RentCarInput_Rental,
    $location: RentCarInput_Location) {
  RentCar(
      rental: $rental,
      Location: $location) {
    result {
      rental {
        car {
          brand
          indication
          fuel
        }
        driver {
          indication
        }
      }
    }
    validationViolations {
      path
      message
    }
  }
}
{
"rental": {
"carId": "YvdK0lSZ86XRfZV6",
"driverId": "xjA77qbDNss01MfG",
"start": "2022-12-02",
},
"location": {
"lat": 53.551086,
"lon": 9.993682
}
}This carId is one with fuelType 'diesel'
{
  "data": {
    "RentCar": {
      "result": null,
      "validationViolations": [
        {
          "path": "RentCar",
          "message": "Diesel price too high"
        }
      ]
    }
  }
}
{
"rental": {
"carId": "en5opMGNAase1WVv",
"driverId": "xjA77qbDNss01MfG",
"start": "2022-12-02",
},
"location": {
"lat": 53.551086,
"lon": 9.993682
}
}This carId is one with fuelType 'super'
{
  "data": {
    "RentCar": {
      "result": {
        "car": {
          "brand": "Opel",
          "fuel": "super"
        },
        "driver": null,
        "rental": {
          "id": "o6jDEZyNwkiAbHRj",
          "start": "2022-12-02"
        }
      },
      "validationViolations": []
    }
  }
}
As you've seen we were able to implement a quite complex business requirement purely by convention and configuration. Keep in mind, any part requirement that cannot be expressed in this way can be implemented in code and you can still use the benefit of convention over configuration of the rest.